Showing posts with label nail art. Show all posts

Wednesday, December 23, 2015

Holiday Nails

Its the most wonderful time of the year... to try out some fun and easy holiday nails! So I'm going to share some of the designs that I've been enjoying this season. Maybe this will inspire you to try a few of your own, or at the very least put you in the holiday spirit!

Here is a swatch wheel of some Christmas/Winter nails that I didn't quite finish... (I'll finish before the year ends.. hehe)


This is my gel manicure from today. 


and if you want to get CRAZY.... here is a tutorial of an easy holiday nail design.


Hope you all have a happy and healthy holiday...

Thanks for checking out this post! 
Feel free to let me know what you think.
Take Care.

Tuesday, July 8, 2014

Nail Polish and Nail Art Storage

Collection and Storage

So here's just one way that I have stored my nail polish/art collection. I have actually moved out of my apartment since these photos were taken, but I do like how everything was set up so I figured I'd share. Ya never know, it might inspire someone else to reorganize their goodies. =D

Hopefully, once I am settled into my new place, I can store my nail stuff a little differently and share it all again!
So this acrylic nail stand was about $25 at a wholesale nail supply store. It holds approximately 90-100 polishes. I plan to buy 2 more soon, because I have gotten many more polishes since this photo was taken. :O
I store my art/manicure tools inside these small peach and black containers to help keeps things from getting mixed up and cluttered. They were about $1 for 3 at Dollar Tree. I've also seen them at Five Below.

In this other drawer I have some 3D nail art, extra buffers, and all of my top coats. There are a total of 3 drawers in this storage unit. and I bought them at Target. 

I keep these things inside my manicure table on the shelves. I keep acrylic, oils, sanitizer , alcohol, extra paper towels, lotions and some acrylic paint in here. :)
These flowers were just a little something to pretty-fy my manicure station, as well as the leopard lamp shade! BTW my manicure table was a custom made gift my my brother. :D
Business cards are from Vista Print
Thanks for reading. Feel free to comment and give some your own advice/tips to store beauty products. :)

Thursday, January 2, 2014

Very First Nail Tutorial Video on Youtube!

Cute, Simple Nail Art Tutorial

Sooooo, I've been wanting to upload tutorials on YouTube since FOREVER ago. I mean like back in 2007 or 08. But for some reason, to me, YouTube is an intimidating new territory. I have heard a lot of horror stories about hateful viewers, and I have actually witnessed so many "trolls" over the years. So the fear of someone judging the work I post has been just too much for me. 

BUT, now I am at a place in my life where I just do not care!!! I'm still nervous, don't get me wrong. I still have a fear of judgement and the unknown. But I had fun making this video. I love what I do. I'm proud of my work. So basically if anyone has something nasty to say (excluding positive or helpful criticism) then my response to them will, now and forever, be F@*& YOU!! :D 

So if you're interested in checking out my very first video tutorial, and seeing how I did my simple nail art, click on the video below. :)


Thanks so much for reading this blog post and checking out the video if you have. Let me know if you would be interested in more.

-Jenny

Thursday, December 26, 2013

Cheetah/Leopard Print Mint Green Nails

Just a random post to share a recent full set and nail art I just did. Hope you like. :)


Thank you fr checking it out. Hope you enjoyed. 
-Jenny

Thursday, December 12, 2013

Easy, Trendy Nail Art

Nail Art Pictorial


If you would like to achieve this nail look, follow the instructions below. =D

  • To get the best, cleanest look with your nail art, you always want to be sure to prep your nails to the best of your ability. Start out with a clean, manicured set of nails.


  • Before applying color, always make sure to use a base coat to protect your nails and to avoid staining.

  • Once your nails are ready, you can begin to apply 2-3 coats of polish, letting them dry fully in between each coat. (Thumb & index finger: Yellow, middle finger: pale pink/nude, ring finger: silver, pinky: hot pink/fuchsia)

  • When the polish dries, the fun part begins!! On your yellow thumbs paint a little more than half of it with a nice coat or 2 of the hot pink color. It does not have to perfect. Allow it to dry.


  • Then use a thin striper to draw a white section in the center of the pink and yellow. It will kind of look like a candy corn.

  • To create the black lines, use a nail art brush and take your time. The pattern can be whatever you like it to be. Zebra, or just random lines.

  • The index finger: Using a nail dotting tool, or the end of a bobby/hair pin, make small and medium sized polka-dots. You can dip the dotting tool into black acrylic paint, or any black nail polish.

  • On the ring finger, use an assortment of medium and small, silver and pink rhinestones and cover the entire nail. For the pinky, I used silver rhinestone to create a triangle shape. (apply a clear coat of polish to your nails and then gently place rhinestones on the top of the wet nail.)


  • Lastly, apply a top coat, clean any excess polish from the cuticle or skin area, and apply cuticle oil. Then you're good to go!!


Thank you for checking out my nail art!! If you liked this pictorial please let me know in a comment below. Hope you enjoyed.

Stay HAPPY and HEALTHY.

<3 Jenny

Tuesday, December 10, 2013

Fun, Fabulous, Fall Nails

Nail Art Pictorial
  • So the first thing you always want to do before painting your nails, is to make sure you start out with a clean, prepped canvas. If you are working with your natural nails, give yourself a quick manicure. That includes cleaning your cuticles, shaping your nails, buffing and cleaning under the free edge etc.. I personally am working with artificial add ons (acrylic tips) that I do myself. If you're working with acrylic nails you want to make sure they are refilled and ready to go.

  • So before you put polish on your nails, you always want to add a base coat to avoid any staining to your natural nails. I apply a base coat to my acrylic nails because I change polish often and staining isn't too appealing.

  • Once you've applied a base coat, you can then begin to add colored polish. I chose a gold, purpley/maroon, black, and a rosey gray color for my nails.


  • Apply 2-3 very thin coats, letting each coat dry about 10-15 minutes before applying the next. This will help avoid your polish being too thick, and that ANNOYING smudging!!

  • Next, to achieve a basic cheetah/leopard print nail design on the middle and ring fingers, I created small "round-ish" spots on my nails. I randomly placed them and spread them out so that I had room to add the black outlining. 

  • Then, using a small dotting tool (or the tip of a bobby/hair pin), start to paint uneven parentheses surrounding each spot. Keep in mind that you want your parentheses to have a random wiggle to it so it can look more natural. Also, add black dots in open areas on the nail.

  • For the pinky finger, I used a gold nail art brush to draw 4 vertical lines. Then on my index finger I decided to go with a "Chevron/Charlie Brown shirt" design using the same nail art brush.


  • Give your nails plenty of time to dry, then add a top coat. Clean any excess polish on the edges of your nails. Nourish your cuticles with cuticle oil and you're good to go.


Thank you for checking out my nail art!! If you liked this pictorial please let me know in a comment below. Hope you enjoyed.

Stay HAPPY and HEALTHY.

<3 Jenny


Tuesday, June 12, 2012

Life...and Instagram :)

Hey Everyone!
Okay so I say this in every post, but I'll say it again.. Sorry for the lack of blog updates. I really want to only post things that I take my time to work on. I like to triple check for spelling errors, make sure I "dot my i's" and "cross my t's" and present my thoughts in an organized way. That requires a bit of time and energy, so when I'm fresh out of both... I stay away from Blogger. I don't want to post things just for the hell of it and I don't like when I'm reading something and it feels rushed so I wouldn't write anything like that.. at least not intentionally. So basically what I'm saying is I would rather have fun when I do this and post QUALITY over QUANTITY!! 

Moving on, part of the reason for me checking out of Blogger is because I have been a sickly pile of sick and it is not cute, nor fun. I believe I'm getting better, but it could just be an illusion because of how BADLY I wish I was. Nothing too serious though.

Another part, I have been spending a lot of time with my family lately. I have a ton of siblings, and lately it has been really cool spending time with people that I love and can't stand.. haha. BBQs, pool parties, laughing, arguing... its very exhausting really. LOL :P

I promise I will be doing many more posts coming up soon because I am on break from school for the summer. So there will be plenty of time to go explore some new/old beauty products and come on here to tell you alll about it!!! 

For now, the best way for any kind of update, or social networking from me, would be through the infamous INSTAGRAM. I absolutely love Instagram! At first it annoyed me because I felt like it lagged on my phone.. but after re-installing it, I am hooked! It is a really great way to share photos, to get to know people, and to be creative. So if you don't have one, and you love to take pictures I would highly recommend it. And if/when you do, come and follow me!! @jennybo0o
Here's what I've been posting lately...


Be sure to keep checking in and please bare with me.

Until next time...
Jennybo0

Monday, May 14, 2012

International Beauty Show New York and Haul!!!


Heyyo!! I am terrible at updating this blog, it’s awful! So I've been meaning to update everyone on my weekend from a few weeks ago (OMG!!), specifically Sunday, April 22. I was fortunate enough to go to New York City and attend the International Beauty Show. I had SUCH a fun time, I got to see so many interesting things, great products and fun gimmicks that some companies used to attract attention. It was really a blast and I have never felt more "at home" then when I was surrounded by so many people that were interested in what I love. I went there with the intent to absorb information, learn things and to just take in the new experience. I didn't really intend on buying much, or blowing tons of money. I did however, manage to get a good deal of things (along with a few samples), and I am going to share the products with you all. I would like to mention that this is not in any way a review of these products, I didn't have a chance to use many of them yet... but in the future I hope to share my opinions on some of the things that I mention. Feel free to ask for a review/opinion on any particular products that interest you.
entering the show

There were so many people, it felt as chaotic as this looks

Ahh, where to start?!?!? Okay, so going to the IBS I didn't really know what to expect. I have never been to any type of expo, although it has been my dream to go to IMATS for a while now (I'm sure I'll go some time in the near future). So in comparison to all of the information I have researched on IMATS, the IBS is quite similar, only.... minus the makeup:( Don't get me wrong, there were booths set up selling makeup and a couple application classes that were makeup related, but the show is focused mainly around hair. There were stages set up with hair dressers teaching other stylists how to style and use the latest hair care products and tools. Models sat on stages being the main focus for tutorials, and some stations even tried out their products on customers and potential sponsors. I remember in particular there was a company that sold hair feathers, tinsel, hair jewelry and two-toned clip in hair extensions, and they were applying tinsel and hair jewelry to customers interested in buying their products. It was pretty cool to watch.
main hair stage


Can you believe these brave ladies were on stilts?!?
One of the most exciting things to watch had to be the Dinair Airbrush area, where they gave free makeovers, cool airbrushed hair, fantasy hair and makeup, and even 3D hair art!!

Dinair station

some of the beautiful fantasy hair

3D hair art!!


Haul Time!!

Nails…
One of my guilty pleasures in life, are nail products. I love nails polish, nail art and designs.  I am far from a professional, and anything I do on my nails (9 times out of 10), I cannot recreate on someone else's nails.

{{So big props to any and all nail artists and manicurists.}}

Anywho... there were equal stations set up for nails and makeup alike. So I did indulge in a fewww nail products that were just too cheap to pass by. I got a few new nail clippers($1 each), a base coat($2), a buffer($1), some art brushes($1 each), and some 3d nail art($1 each…super cute btw!). I also got a few design polishes in colors that I didn't have($2, b5g1). So I definitely didn’t spend tooo much on nails :)
3D nail art

design polishes


Makeup…
The only makeup products that I purchased were the Giselle Cosmetics (GC) Mineral makeup stacks($30 for 1/b2g2 free), lashes(Sassi-$1!!), a couple of brushes(Crown brushes-$2 each), and a beauty blender(Crown-$9). I got two stacks of the GC and each came with 8 shadows. There was a Naked Cosmetic station area set up with similar products, however GC offered a better deal, and had beautiful colors. So I decided to buy them. The cool thing about this makeup is that it can be used in many different ways. You can turn it into a lip gloss, nail polish, mascara, etc., so they can be very versatile.
Giselle Mineral Makeup Stacks

Sassi Lashes (only $1!!)
Crown Beauty Blender
Crown Brushes ($2 each)


Hair…
As far as hair goes, I only purchased a mini straightener (Magma-$10), and a MorrocanOil Intense Hydrating Mask ($15!!!!). ßThat was a STEAL!

Magama

hydrating mask

SAMPLES!!!
So the things that I got for free all pertain to hair care. The thing I was most excited about was the MorrocanOil treatment samples that were being given away. Everyone and their mommas were trying to grab one or two of these bags. I got one and it had 2 small samples of both the regular oil treatment, and the light version. (0.34 Fl.OZ/10 ml). They smell AMAZING!! And feel so great in my hair. I am in love. I also got a full size bottle of Vodana Pro Magic Dioscorea Japonica Root Extract Therapy.(8.53 OZ) I got about 8 different sample packs of a variety of things from Miss Jessie's hair care line, and I also got some packets from Agadir Argan Oil. (Which I love as well...)
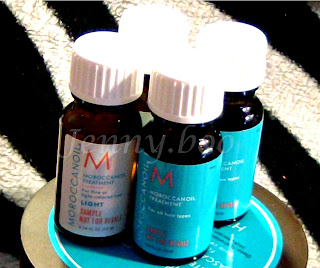
MorrocanOil Treatments

Vodana Repair Cream

One of the 8 sample packs from Miss Jessie's

Okay, so in general I feel like I got a good amount of items, definitely things that I have been enjoying, and am excited about trying. But I have to say, even if I didn't get any actual items, I would have still enjoyed going just as much. I had a great time, I learned some things, and I was in awe at others. Beauty and fashion surrounded the convention and it was a thrill to experience a taste of New York, and all that the beauty industry has to offer even for just one day.

Extra Pictures..
entering the Lincoln Tunnel

I<3NY 

the outside of the convention

Bye-bye New York.... Until next time:(

EXHAUSTED!